


28 Sep 06. Electrical Bling
This Episode
- Install custom side panels
- Install toggle switch for mood light & another dual USB port
- Build custom fuse box in cargo area
- Install shore power outlet & dual USB port in cargo area
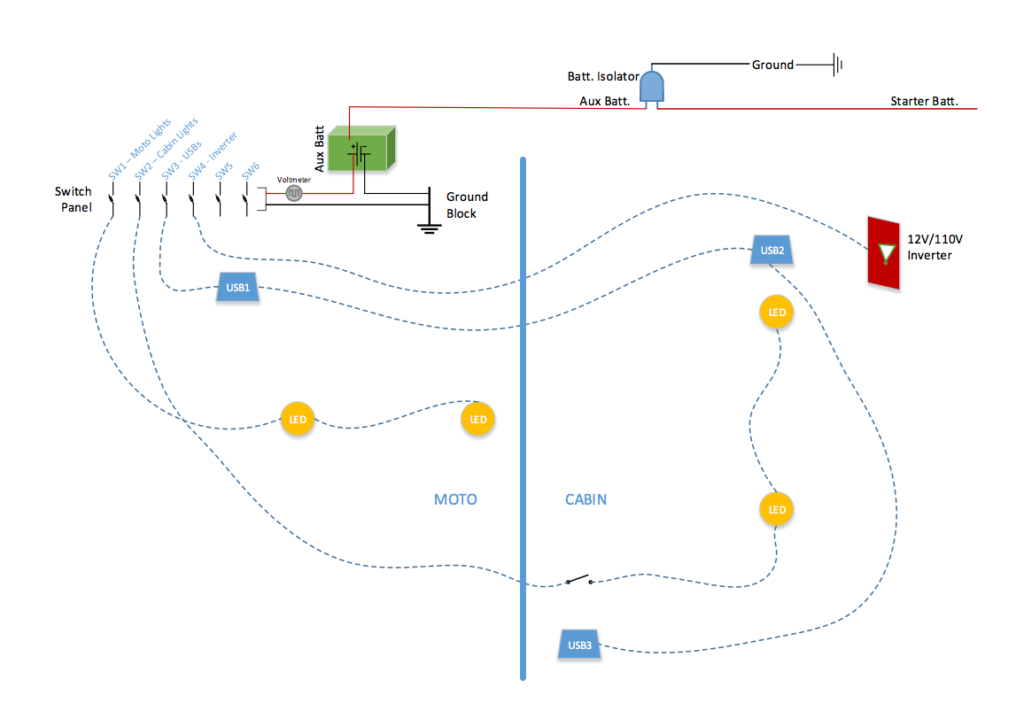
Wiring Diagram
Before heading back to showing the custom fuse box I made.. I use panel board to customize some of the cabin walls & add more LEDs
Hopefully you can see the potential with this area! It had to be cleaned up and I wanted to use it as a place for another USB port and switch for some “mood” lighting!

Using the same panel board I used for the sidewalls, this panel will be home to the toggle switch and dual USB port..

Paint is a must!

Used caulk to keep the switches in place..

Control panel mounted up… using some stainless steel metal screws.

Here’s the top panel.. it turned out really good.. if you ask me.

I had a leftover LEDs from that string so, I decided to add some mood lighting… I ran these lights above the header of the side door and they are controlled by the green LED toggle switch. To hide the cable that runs between each LED I cut wire loom and snapped those in place.. makes it look all so cool.

Lights on!

Fuse Panel Box
I wanted to keep the fuse panel out of the cabin area as well as the second battery. The box had to allow me to get to the wiring easily yet still out of the way. So I built my own box, it turned out good, I’m no master carpenter but that’s what makes this project so enjoyable. Accomplishing things I typically never try! So.. I got to planning and building..
The items the box would house..

Putting it all together..

Time for paint..

Boom.. graffiti artist..

I didn’t care if the inside was painted or not.. Used 90 degree angle brackets to old the pieces together. My goal was to easily be able to take this box apart if I ever needed to in the future..

Before we can install the fuse box, we need to bring shore power in.. so I got a 15-Amp Power Inlet plug from etrailer.com for shore power. I can now plug my van into an electric campsite and have 2 outlets… Had to cut a whole in the van wall.

I used a piece of Kydex as a large washer between the inside wall and locknut.

Dusk cover installed.. nice and clean!

Mounted in the rear of the van behind the drive side wheel well.. shore power inlet comes right into box. What made this great is I could attach it in pieces separately..

Front panels on.. Fused switches & USB port mounted.

All put together.. and ready to test…

Good to go! One switch led light seemed to kinda flake out after installing so I contacted the manufacturer and they sent me a new one free of charge! Great customer service!

The fuse panel lid is on hinges so I can access the back of the panel easily..

Here you can see the wiring to the switches and ground block.. LABEL EVERYTHING!

Another photo of the fuse box in working order…

The voltmeter shows voltage reading of the second auxiliary battery.. this is important to always know what your aux battery voltage is at.

Here you can see the wires coming back to the fuse box from the cabin driver side electronics, all in wire loom.

And here is where the hot comes from the second battery…

In the next post, I’ll show the second battery setup that has worked great for over a year..
No Comments